
Using YaleConnect
YaleConnect is the most effective tool for managing free event registration for your performances. Producers and event coordinators can follow the guidelines below to set up their YaleConnect ticketing. Please contact daisy.abreu@yale.edu with any questions.
If you are not associated with a registered student group, then please go to the Undergraduate Production group page and request to join.
If you are associated with a registered student group, then please go through your group’s page to set up your event ticketing.
- Log into YaleConnect using your Yale netID
- Go to your group’s page
- Select “Events”
- Select “+Create Event”
- Item #1: What
- ENTER the name of your event
- ENTER an event description
- SELECT “Performance” as your event type
- Item #2: When
- ENTER start and end dates and times for the event
- If your event has multiple performances, then see Item #7 for how to add those without having to create multiple registration pages
- Item #3: Where
- If selecting “On Campus Room Reservation” then enter the expected number of attendees
- If selecting “Other Location” then enter the location name and select the “Address” drop down to enter the full venue address
- If selecting “Online Only” then enter your livestream, Zoom, or YouTube link in the “Meeting” information area
- Item #4: Photo & Flyer
- UPLOAD your event photo or flyer
- Item #5: More Details
- Food and drink are not allowed at performances at this time.
- Item #6: Access & Display Options
- SELECT whether you want to make your event registration visible to the general public, YaleConnect members, or specific groups and members.
- Item #7 Registration Options
- SELECT “yes” in response to “Do you want to let people register for this event?”
- The first option you’ll see is shown as “RSVP.” Complete the following steps to change “RSVP”to the date of your first performance
- SELECT “Edit” in the “Manage” column on the right hand side of the page
- CHANGE the name from “RSVP” to the date of your first performance
- ENTER “0” as the price for events not charging admission
- ENTER the quantity available seats for that performance
- DEDUCT the number of house seats you’ll need from your final number of available seats to allow seating for your front of house team
- SELECT “yes” to allow for a waiting list once registration is sold out
- ENTER “1” for “Min per order” and “2” for Max per order”
- ENTER start and end dates and times under “Registration will be open from/to”for when your ticketing will be open to patrons
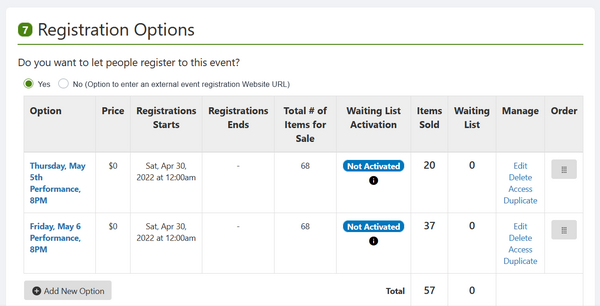
- If your event has multiple performances, SELECT “Add New Option” and repeat the steps above so that your registration options look like the image below
- “Attendance Limit”
- Your Attendance Limit should reflect the total number of seats available across all performances. For example a show with 4 performances and 50 seats available per performance would have an attendance limit of 200 (4 x 50)
- Set “Tickets Limit” to same number you set in “Max per Order” line .
- Item #8: Advanced Options
- SELECT “Co-host this event” and scroll all the way to the bottom of the list to select “Yale College Undergraduate Production” (sixth item from the bottom of the list).
- Adding Yale College UP as the cohost allows house managers and ticketing coordinators access to the system to check in your audience.
Once you’ve set up your ticketing, please submit your event to the Yale College Arts site. Instructions on how to submit your event can be found on the Adding an Event page.
Once approved on the Yale College Arts site, your event will be automatically published on the Yale Arts Calendar and the university wide Yale Calendar of Events.